Skylum’s Luminar NEO is an Artificial Intelligence (AI)-powered photo-editing software designed to elevate your editing process to a whole new level of convenience and precision. Whether you’re dipping your toes into the world of photo editing or you’re a seasoned photographer/editor, you’ll appreciate the software’s powerful capabilities and user-friendly interface.

If you’re already familiar with other photo-editing tools like Lightroom or Photoshop, you’ll quickly grasp the similarities in Luminar. However, where Luminar truly shines is its AI-assisted features, providing an edge in usability and results. And for those just starting out, fear not—the controls are intuitive and learning the ropes is a breeze.
This article serves as a comprehensive guide to help you navigate Luminar NEO, empowering you to transform your images in ways you never thought possible.
1. Download Luminar NEO
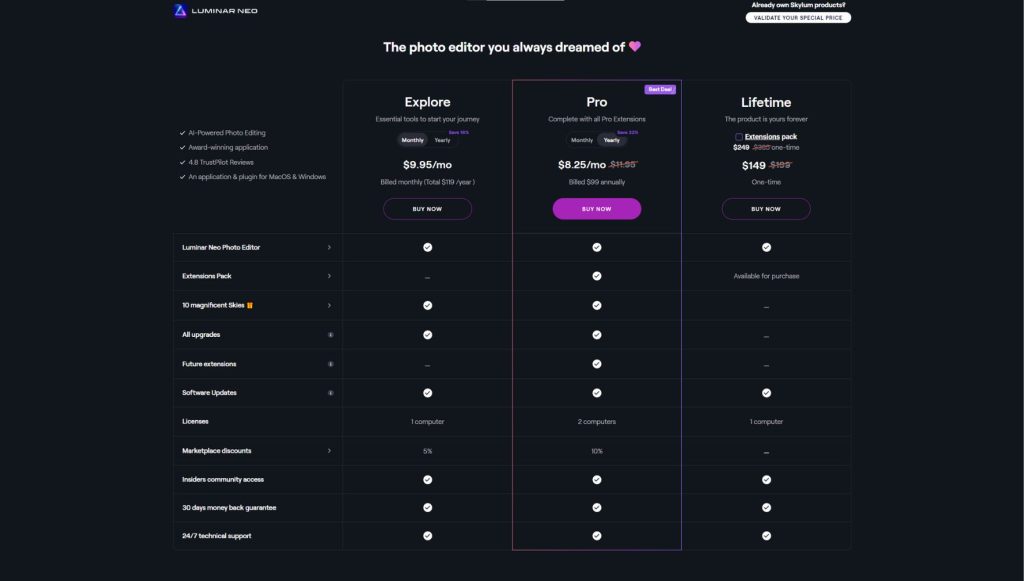
If you haven’t experienced Luminar NEO yet, head over to Skylum’s website to download a trial or purchase the software. You can enjoy the fully-unlocked trial version for seven days. Plus, if you buy the software but later decide it’s not the right fit for you, Skylum offers a 30-day money-back guarantee.
One stand-out benefit of Luminar is that it’s not subscription-based. You purchase it once (check the latest Luminar NEO price here) and you’re set for life—no recurring payments, no strings attached.
2. Importing Images in Luminar
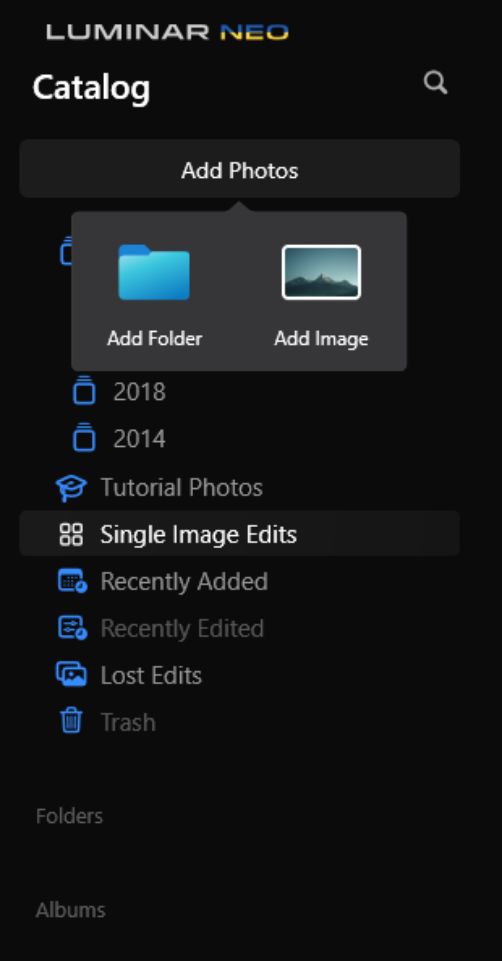
Once you’ve downloaded Luminar NEO, the next step is to start importing your images. Luminar NEO provides two straightforward options: add a folder with images or add a single image. Simply click on the ‘+’ sign at the top left, and you’ll see these two options.
If you have a folder containing all the images you want to work with, selecting the “Add Folder with images…” option will add the folder to the Luminar library. However, if you’re focusing on a single file, go with the latter option.
3. Organizing Files in Luminar Library
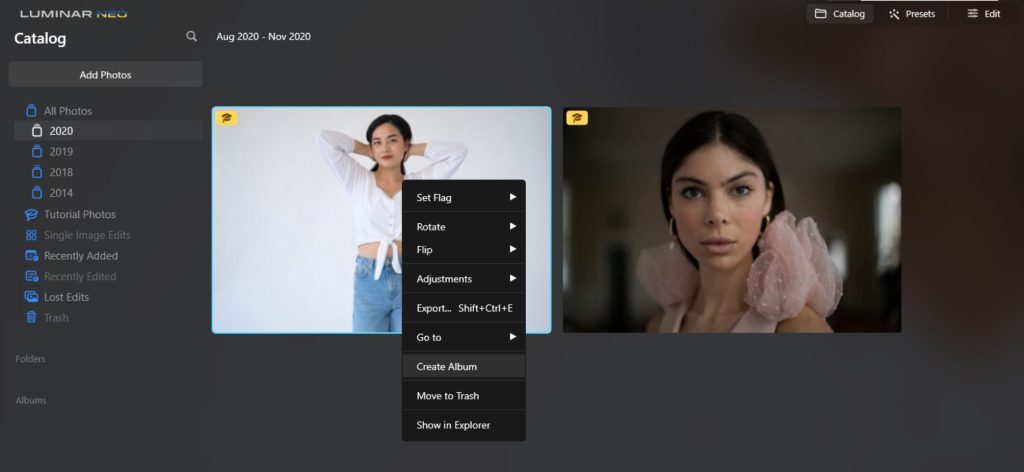
Luminar NEO isn’t just about photo editing—it also features a built-in photo management module that allows you to organize your photos based on date, ratings, and favorites. You can flag or reject images, and Luminar even lets you assign color labels to images, making categorization a breeze.
4. Editing Images in Luminar
Here’s where the magic happens. Editing images is where Luminar NEO truly showcases its power and flexibility. To begin editing your images, ensure you first navigate to the Edit module. Here, you’ll find a myriad of modules and adjustment tools that allow for changes ranging from simple tweaks to complex edits.
a. Looks
For those familiar with other photo editing software, you’ve likely encountered Presets. In Luminar NEO, they’re known as Looks. Essentially, these apply a predetermined set of adjustments to an image, providing a base from which you can fine-tune the adjustments to achieve your desired result. This feature allows for a consistent aesthetic across your images while streamlining your editing workflow.
Luminar NEO comes with a variety of Looks suitable for different types of images. These Looks can help you achieve stunning results in just a few clicks. To apply a Look to your image, first, click on the Looks button at the top-left while in the Edit module. This will reveal a filmstrip view of different Luminar Looks previews below the image.
To apply a specific Look, simply click on one of the previews. You can then adjust the strength or opacity of the applied Look by adjusting the slider that appears on the thumbnail preview.
And remember, you can fine-tune parameters such as exposure, contrast, white balance, and others to your liking. Just head on over to the adjustment sliders on the right in the essential module.
b. Layers
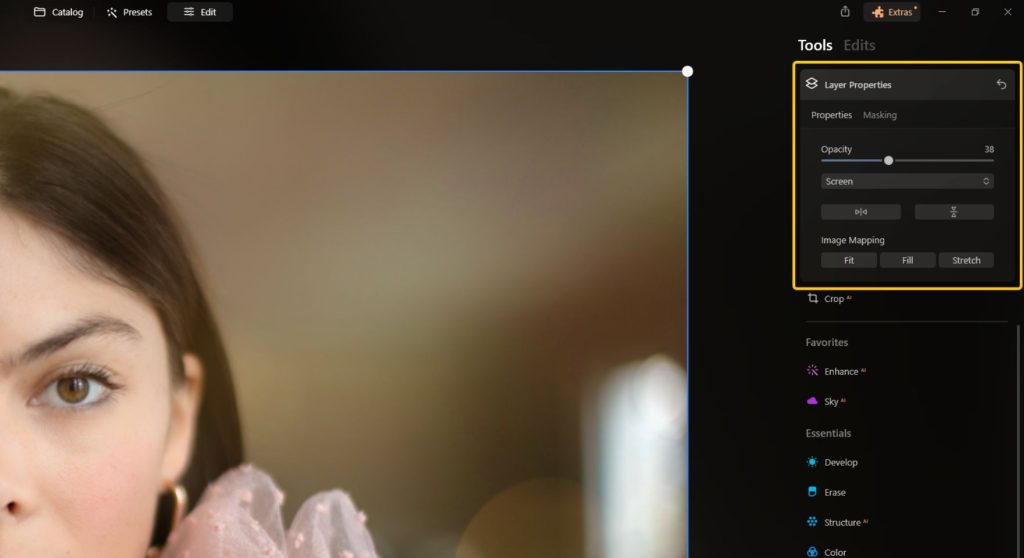
An exciting feature of Luminar NEO is its support for working in layers, akin to Photoshop. This means you can make various adjustments and add different elements across multiple layers. This approach simplifies the workflow by allowing you to revisit specific adjustments without affecting others.
To maximize the use of layers in Luminar NEO, ensure you add a new adjustment layer before making any adjustments. You can do so by clicking on the ‘+’ sign in the Layers module and selecting Add New Adjustment Layer. This way, you can create separate adjustment layers for exposure, contrast, sharpness, masks, and more.
c. Canvas
The Canvas module in Luminar NEO houses the Erase, Clone & Stamp, Lens & Geometry, and Crop & Rotate tools. The Erase tool helps you eliminate any distracting elements from your composition. The Clone & Stamp tool can replicate certain textures or areas on the image to cover any flaws or distractions. The Lens Geometry tool corrects any lens aberrations or distortions, and the Crop & Rotate tool is handy for setting specific aspect ratios for your canvas.
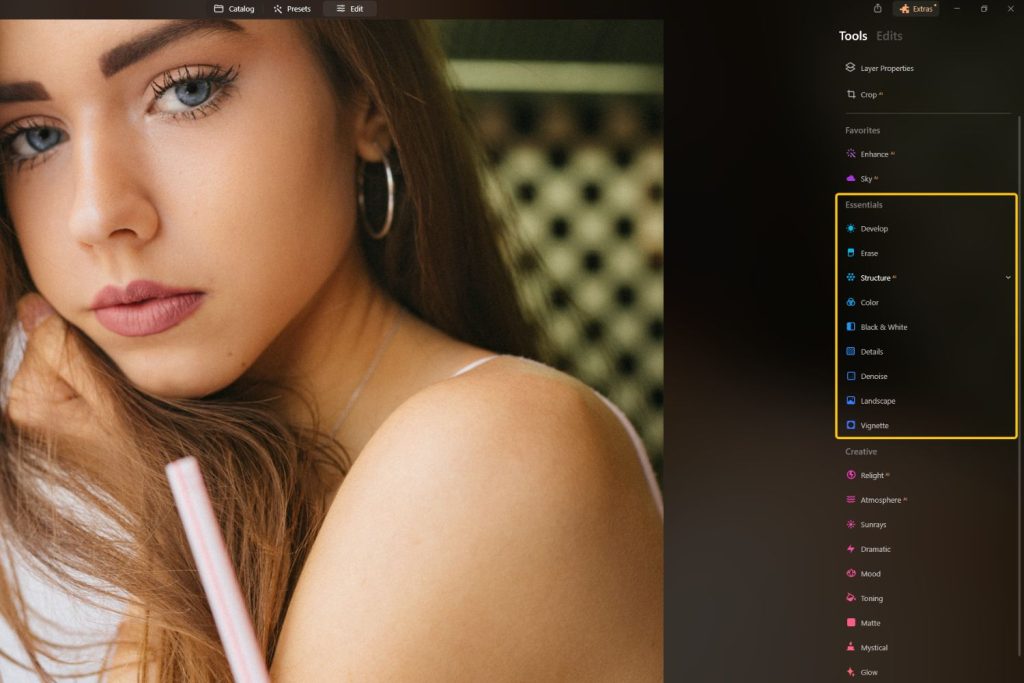
d. Essentials
The Essentials module is where you’ll find most of the adjustment sliders for basic photo editing. If you’re looking to quickly adjust exposure, contrast, highlights, shadows, and details, you’ll find all these tools and more in the Essential module of Luminar NEO.
For example, within the Light panel, you can adjust your picture profile, exposure, color temperature, highlights, shadows, and contrast. If you want Luminar NEO to assist you in making quick adjustments, head to the AI Enhance panel and slide the AI Accent slider to the right. If your image includes a sky, try doing the same with the AI Sky Enhancer. While the results may not be perfect immediately, you’ll have a solid base to start from.
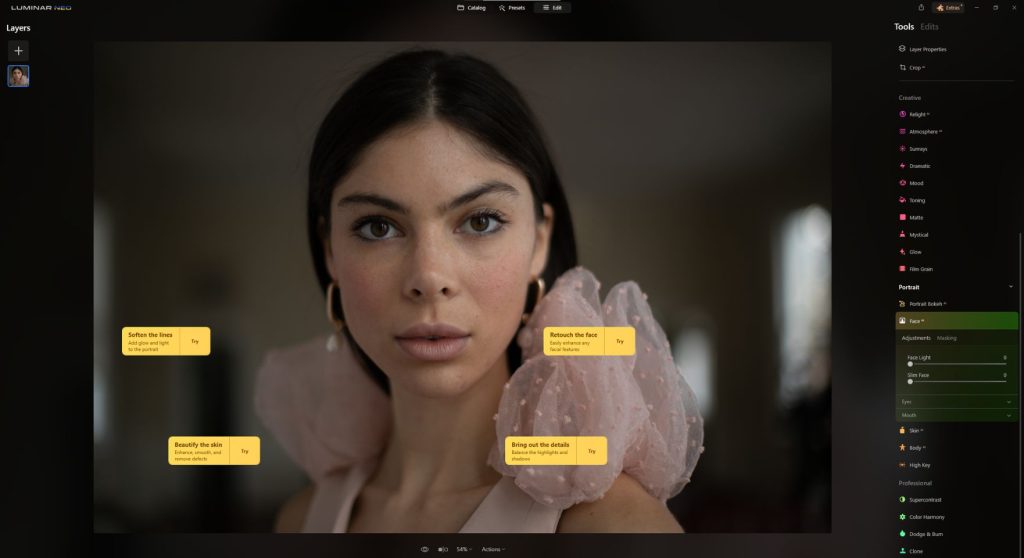
Similarly, the AI Structure identifies objects like people, faces, skin texture, sky, buildings, and more, improving the details selectively rather than applying a global adjustment. If you want granular control over the details, you can do so from within the Details Enhancer panel.
The Color panel offers you adjustments for saturation and vibrance in the image. If your image has a color cast, you can easily remove it using the Remove Color Cast slider.
You can convert your images to black and white within the B&W Conversion panel. This panel allows you to control the luminance and saturation of the major color channels, letting you fine-tune your black and white images.
Control the luminance and color noise in your images from the Denoise panel.
The Landscape Enhancer improves your landscape images by removing haze with the Dehaze adjustment tool, adding a warm touch with the Golden Hour adjustment tool, and enhancing the greens with the Foliage Enhancer tool. For selective adjustments, you can use the masking option.
The Vignette panel lets you add either a dark or bright frame around the corners of the image to draw attention towards the subject.
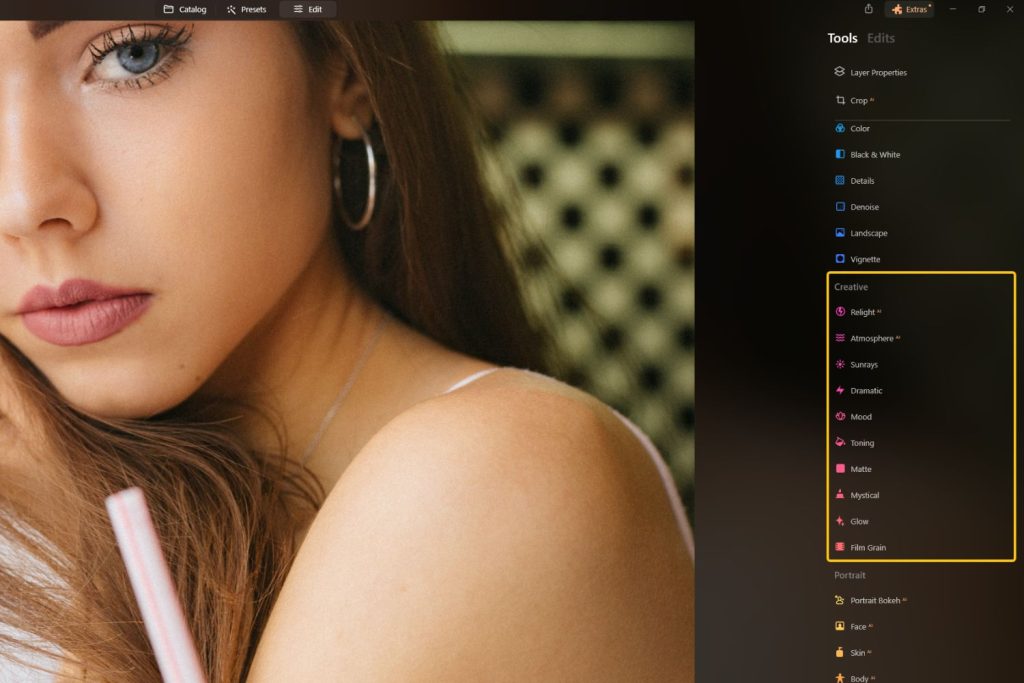
e. Creative
The Creative module is your playground when you’re itching to go beyond the regular adjustments and infuse some artistic flair into your image. This module is packed with tools that you can use to add different creative elements or give an artistic look to the image.
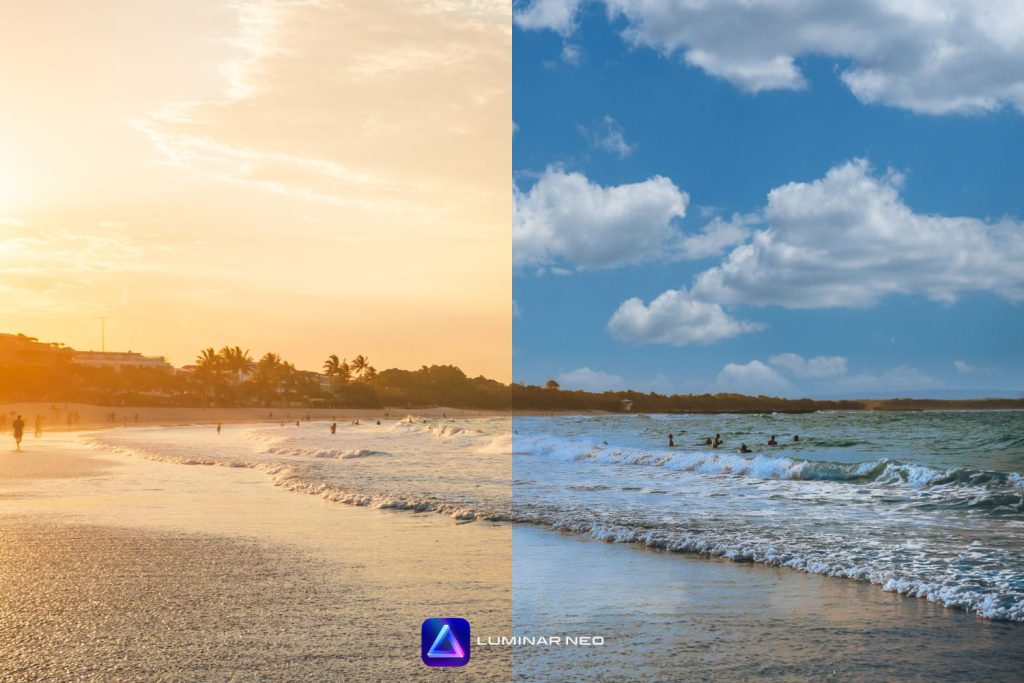
For example, the AI Sky Replacement tool is a standout feature of Luminar NEO. This tool makes replacing skies a breeze, thanks to its remarkably intelligent masking algorithm. The software comes with a bundle of skies that you can easily use in your image with a single click. Simply click on the Sky Selection dropdown menu and choose the sky that best suits your scene. Fine-tune the image to your liking by adjusting the sliders.
AI Augment Sky is another innovative tool that allows you to add creative elements to the sky. With this tool, you can add objects like balloons, birds, clouds, the moon, and aurora, among others. You can even add your own image to the sky.
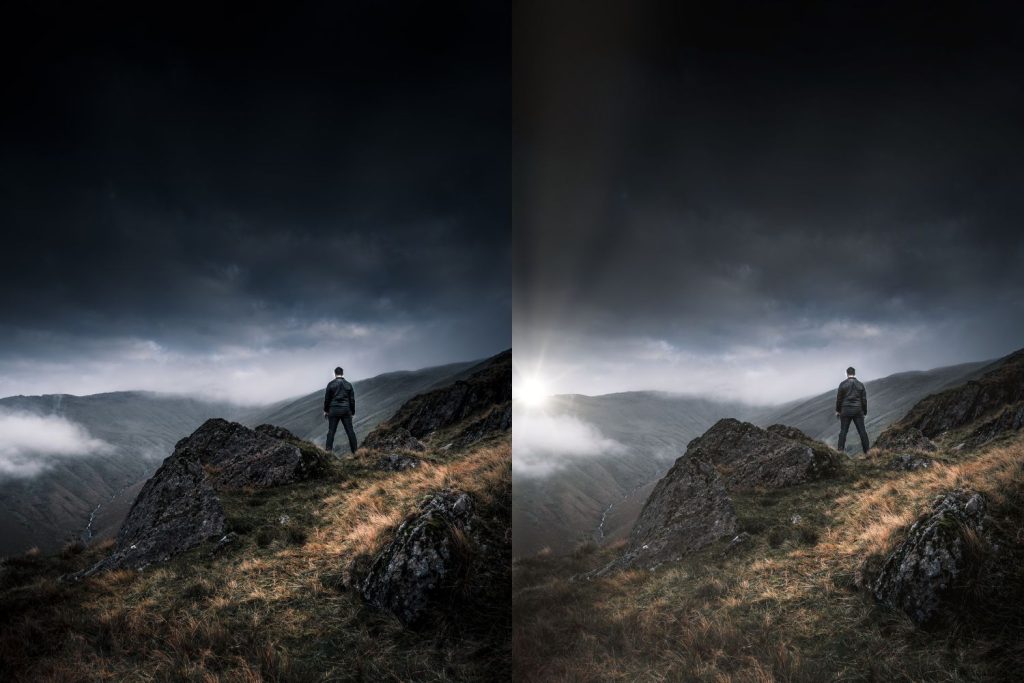
Sunrays can add a beautiful mood to your image. Especially if you’re taking woodland photos, landscapes, portraits, or architecture photos, sunrays peeking through the corner or against the branches can create a magical ambiance. If you weren’t lucky with such sunlight when taking the photos, thanks to the power of AI in Luminar NEO, you can easily add them.
Here again, you get the options to decide the size of the sun, the length of the sunrays, the penetration, and even the intensity of the glow. Use it right, and you can conveniently elevate your images.
If you prefer images with a punch, try the Dramatic adjustments. It adds contrast and takes away some of the colors to give a grungy look to the image. But be careful with this tool—it’s quite easy to overdo it.
Remember the faded yet contrasty look of film photos? You can replicate that look in your images with the Matte Look panel. It works great for portraits if you want to give them a classic look.
Add a soft, dreamy touch to your images in a tasteful way using the Mystical panel. You’ll get a subtle glow with richer colors.
Color Styles (LUT) or Look Up Tables (LUTs) are a series of color combinations that you can apply to your images to give them various looks and feels. They help you achieve a consistent look and feel. While Luminar NEO comes with a few LUTs, you can also add your own favorite LUT to apply to your images.
With Texture Overlay, you can blend two images together. This can be used for a fine art look, to create vintage-style photos, create double exposures, and more. You can also change the amount of the texture effect, zoom, and use blend modes for more options.
The Glow tool in Luminar NEO creates a lighting effect in your images, where the brighter areas (highlights) emit a faded glow, giving a dreamy effect to the image.
You can emulate the grain structure of analog film stocks in Luminar NEO using the Film Grain tool. This tool lets you add the amount of grain, their size, and the roughness.
The Fog filter introduces a hazy fog to your image by simply choosing the type (light or dark) and then the amount. You can also add it selectively using gradient masking or with a brush.

Conclusion
Navigating a new photo-editing software can seem daunting, but with Luminar NEO’s intuitive interface and powerful AI-assisted features, you’ll be editing like a pro in no time. Whether you’re a beginner or a seasoned photographer, Luminar NEO offers a wealth of tools and capabilities to transform your images and elevate your photo-editing workflow. So take the plunge and begin your Luminar NEO journey today!
And remember, photography is a journey of constant learning and discovery. Don’t be afraid to experiment, make mistakes, and learn from them. As you gain experience, you’ll find your unique style and voice in the world of photography. So, are you ready to explore the creative possibilities with Luminar NEO?